
NEW Tutorial 2022! SHOPIFY's NEW OS Store 2.0 allows you to create custom pages of content without having to code( click here to see the new method for custom pages of collections-NO CODING REQUIRED on Shopify's Free DAWN theme)
Create A Page Of Collections in Shopify for the Brooklyn Theme
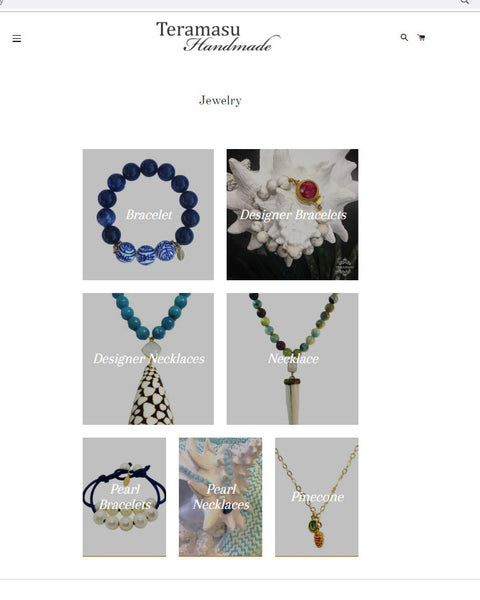
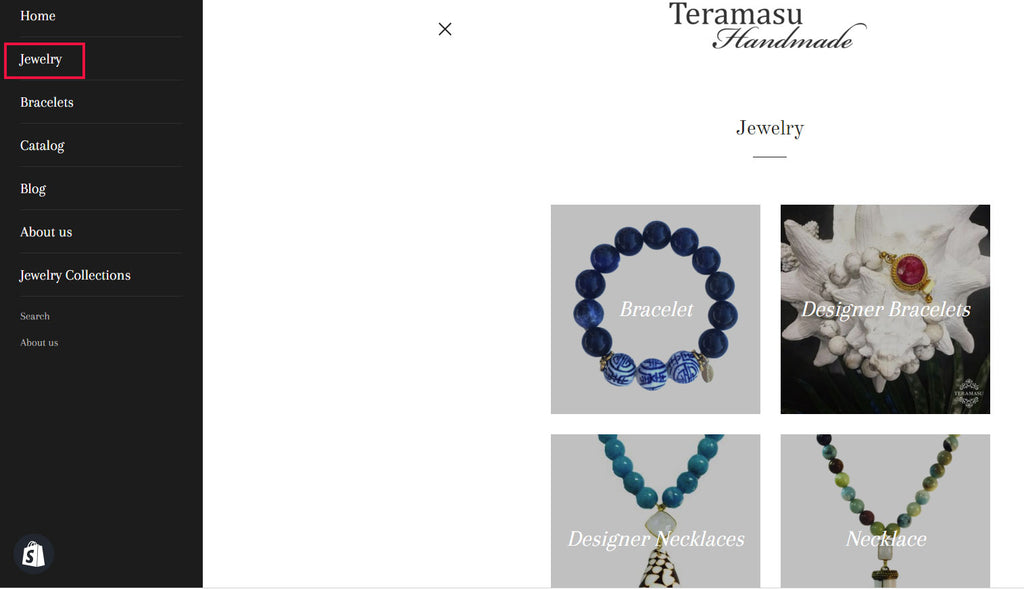
Adding a custom page template to your Shopify theme will allow you to create a custom page with only collections you specify. For instance, you can make a page called Jewelry and have only the Bracelet Collection, Necklace Collection, and Earrings Collections, then you could create another page called Designer Jewelry and list only the Designer Bracelet Collection, Designer Necklace Collection, and Designer Earrings Collections.
Custom Page Template
You will Create a Custom Page template for each Custom Collections Page of Collections you need. For example: You could have a template for page.bracelet-collections.liquid and a template for page.jewelry-collections.liquid. You would then create a section for each changing the Schema name which is shown in green text within the code.
As always I recommend you make a backup of your Shopify Theme before beginning.
First You will Want to Create a New Page Template in Edit Code Area of Your Theme. Use the name shown in orange or create your own.
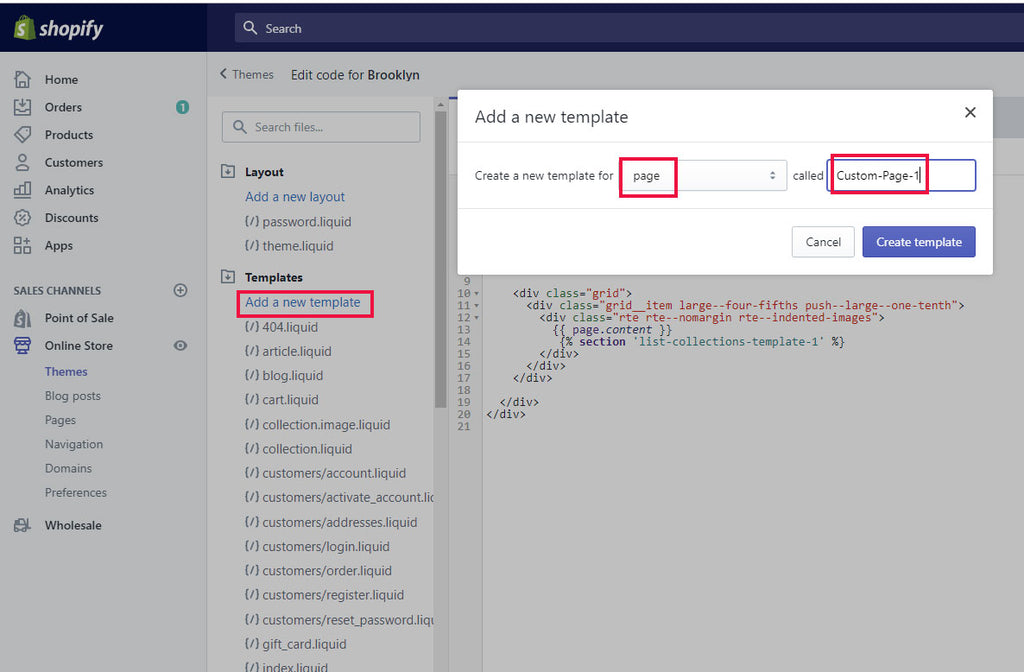
To create a template in theme code editor under Templates choose add a new template. Select page from the dropdown, then enter the name of your template. Copy just the portion in orange below for the name.
page.custom-collection-1.liquid
Copy the 1 line of code in blue for page template.
{% section 'list-collections-template-1' %}
Find this code in the template: {{ page.content }} and place the cursor after the last bracket, then hit enter to create a new blank line below the code.
Paste the copied code in the line below the {{ page.content }}.
Copy code in blue from <!-- /templates/page.liquid --> to the last </div> below. Note the section name in Green. each new page template will need the new unique section name.
<!-- /templates/page.liquid -->
<div class="grid">
<div class="grid__item large--five-sixths push--large--one-twelfth">
<header class="section-header text-center">
<h1>{{ page.title }}</h1>
<hr class="hr--small">
</header>
<div class="grid">
<div class="grid__item large--four-fifths push--large--one-tenth">
<div class="rte rte--nomargin rte--indented-images">
{{ page.content }}
{% section 'list-collections-template-1' %}
</div>
</div>
</div>
</div>
</div>
Custom Section
Note: You Need a unique Schema(see green text below) name for each Section you create. For example necklace-collections.liquid So you will need to create a new page and a new section for this custom collection and edit the new schema name in the new section.
Sample do not copy:
{% schema %}
{
"name": "necklace-collections",
"settings": [
{
To create a Section in theme code editor under Sections choose add a new Section. Select a name and save. Copy just the portion in orange below for the name and choose save.
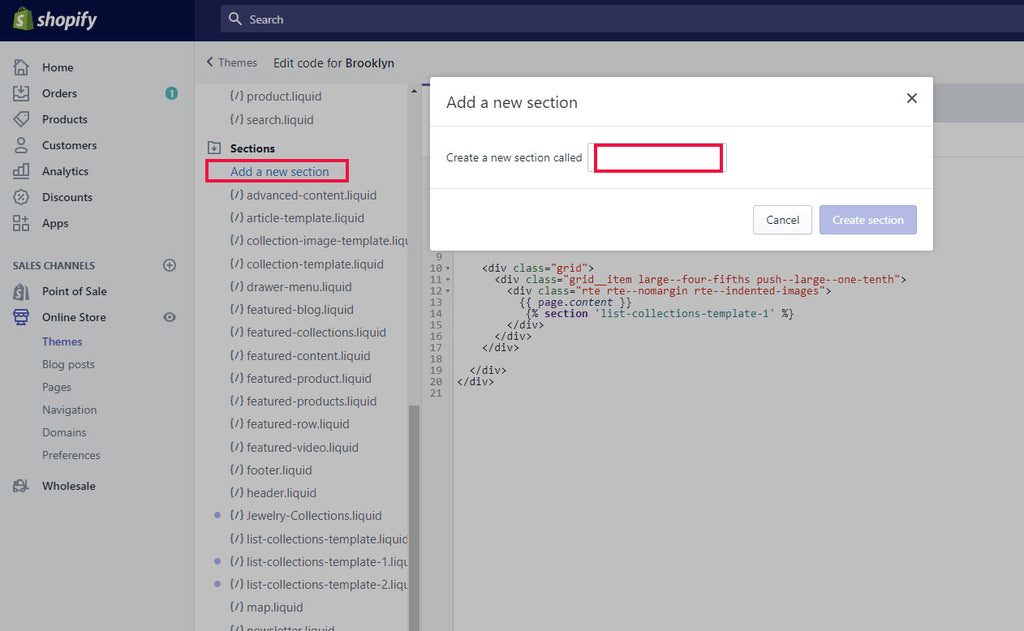
list-collections-template-1.liquid
Delete the prepopulated code and replace with the code below:
Copy code in blue from {% commment%} to {%endschema%} below. The Code in green containing schema name can be changed when adding new sections.
New Code
{% comment %}
This page represents the /collections and /products pages.
It is an optional, but highly recommended, template for your theme.
More info:
- http://docs.shopify.com/manual/configuration/store-customization/taking-control-of-collections-listing
Loop through each collection, except 'frontpage'.
{% endcomment %}
{%- assign collection_count = 0 -%}
{%- assign isEmpty = true -%}
{% comment %}
Count how many collections we have to show
{% endcomment %}
{% if section.settings.display_type == 'all' %}
{% case section.settings.sort %}
{% when 'products_high' or 'products_low' %}
{%- assign list_collections = collections | sort: 'all_products_count' -%}
{% when 'date' or 'date_reversed' %}
{%- assign list_collections = collections | sort: 'published_at' -%}
{% else %}
{%- assign list_collections = collections -%}
{% endcase %}
{% for collection in list_collections %}
{% unless collection.handle == 'frontpage' %}
{%- assign collection_count = collection_count | plus: 1 -%}
{% endunless %}
{% endfor %}
{% else %}
{%- assign collection_count = section.blocks.size -%}
{% endif %}
{% if collection_count > 0 %}
{%- assign isEmpty = false -%}
{% endif %}
{%- assign collection_index = 0 -%}
{%- assign divisible_by_three = collection_count | modulo: 3 -%}
{%- assign divisible_by_two = collection_count | modulo: 2 -%}
<div class="grid collection-grid">
{% if section.settings.display_type == 'all' %}
{% if section.settings.sort == 'products_low' or section.settings.sort == 'date' or section.settings.sort == 'alphabetical' %}
{% if isEmpty %}
{% comment %}
Add default collections to help with onboarding
{% endcomment %}
{% include 'onboarding-featured-collections' %}
{% else %}
{% for collection in list_collections %}
{%- assign collection_handle = collection.handle -%}
{% if collection_handle == 'frontpage' %}
{% continue %}
{% else %}
{%- assign collection_index = collection_index | plus: 1 -%}
{% endif %}
{% include 'collection-grid-collage' %}
{% endfor %}
{% endif %}
{% else %}
{% if isEmpty %}
{% comment %}
Add default collections to help with onboarding
{% endcomment %}
{% include 'onboarding-featured-collections' %}
{% else %}
{% for collection in list_collections reversed %}
{%- assign collection_handle = collection.handle -%}
{% if collection_handle == 'frontpage' %}
{% continue %}
{% else %}
{%- assign collection_index = collection_index | plus: 1 -%}
{% endif %}
{% include 'collection-grid-collage' %}
{% endfor %}
{% endif %}
{% endif %}
{% else %}
{% for block in section.blocks %}
{%- assign collection = collections[block.settings.collection] -%}
{%- assign collection_handle = collection.handle -%}
{%- assign collection_index = forloop.index -%}
{% include 'collection-grid-collage' %}
{% endfor %}
{% endif %}
</div>
{% schema %}
{
"name": "Collections list page 1",
"settings": [
{
"type": "paragraph",
"content": "All of your collections are listed by default. To customize your list, choose 'Selected' and add collections."
},
{
"type": "radio",
"id": "display_type",
"label": "Select collections to show",
"default": "all",
"options": [
{
"value": "all",
"label": "All"
},
{
"value": "selected",
"label": "Selected"
}
]
},
{
"type": "select",
"id": "sort",
"label": "Sort collections by:",
"info": "Sorting only applies when 'All' is selected",
"default": "alphabetical",
"options": [
{
"value": "products_high",
"label": "Product count, high to low"
},
{
"value": "products_low",
"label": "Product count, low to high"
},
{
"value": "alphabetical",
"label": "Alphabetically, A-Z"
},
{
"value": "alphabetical_reversed",
"label": "Alphabetically, Z-A"
},
{
"value": "date",
"label": "Date, old to new"
},
{
"value": "date_reversed",
"label": "Date, new to old"
}
]
}
],
"blocks": [
{
"type": "collection",
"name": "Collection",
"settings": [
{
"label": "Collection",
"id": "collection",
"type": "collection"
}
]
}
]
}
{% endschema %}
Now Create a Page and Use Your New Custom Collection Page Template
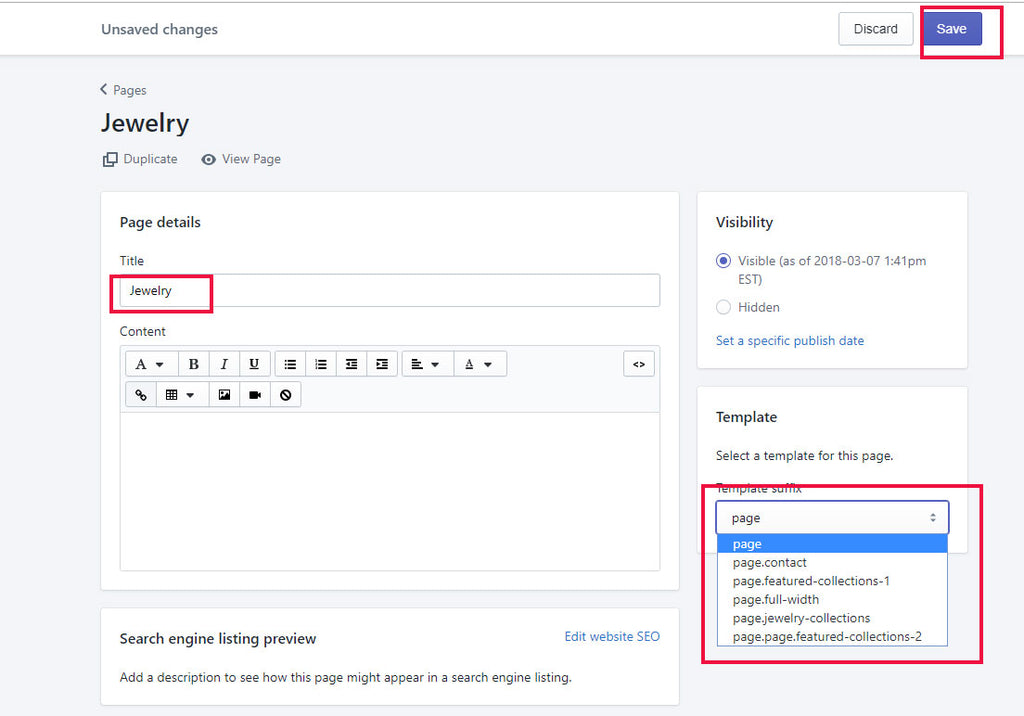
Go to pages in the Shopify Admin: Choose Add a Page. Name Your Page with a Title. For expample if your page is a page of Jewelry Collections, you could name your page "Jewelry". Once named, you can choose the template dropdown and choose the custom-collection-1 template.
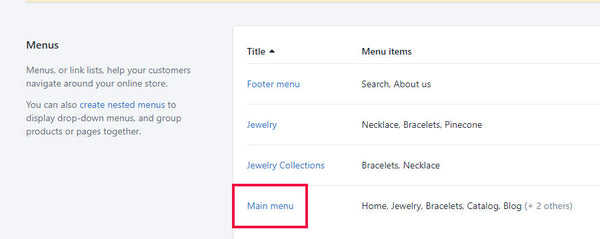
Create Navigation Menu to Your Page of Collections
You will need a way to Navigate to your page of Collections in Shopify. Here are the steps to create navigation menus in Shopify.
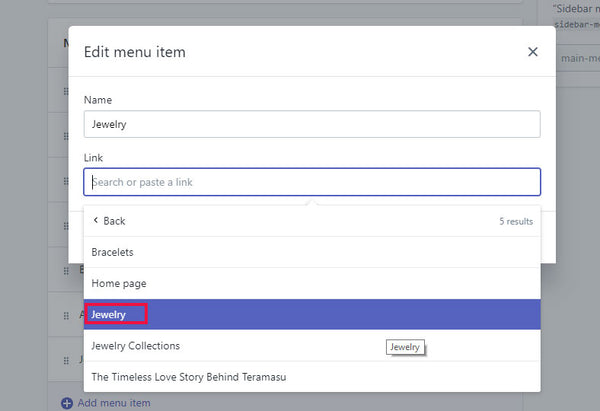
First Go to Navigation in the Admin and Click the Main Menu in Blue to expand the menu.
Click Add menu item if you do not already have a Menu where you want to connect the page.
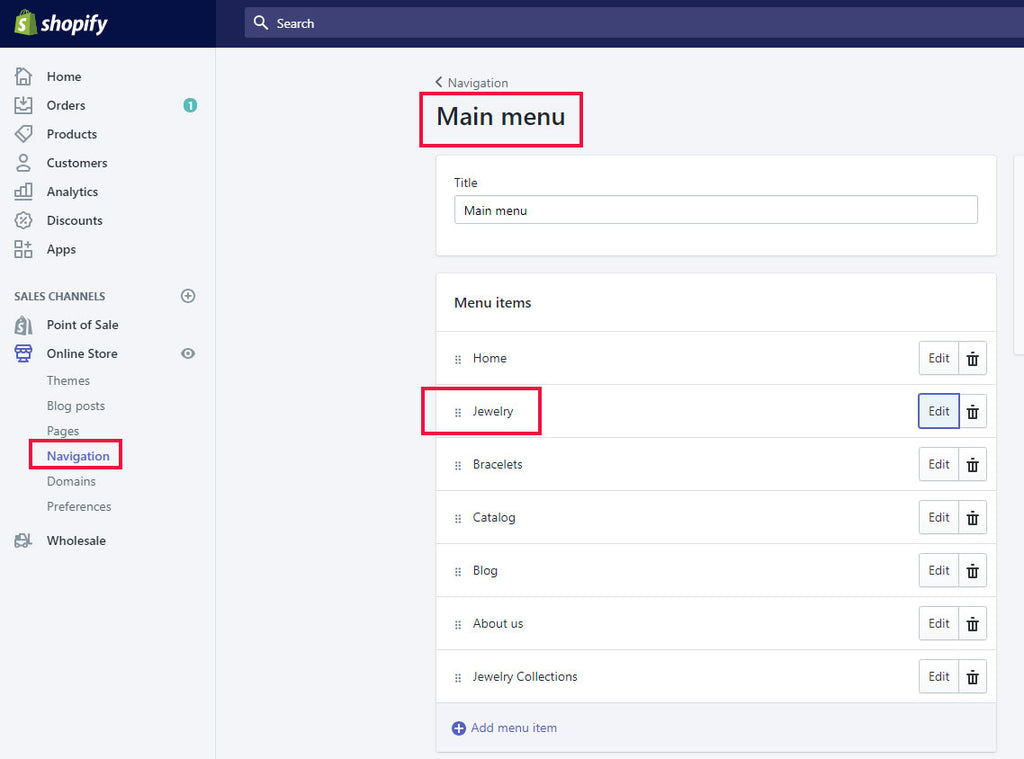
Otherwise, Click edit on the menu you want to Connect. Add the Name and Select Page then Select the Pages.
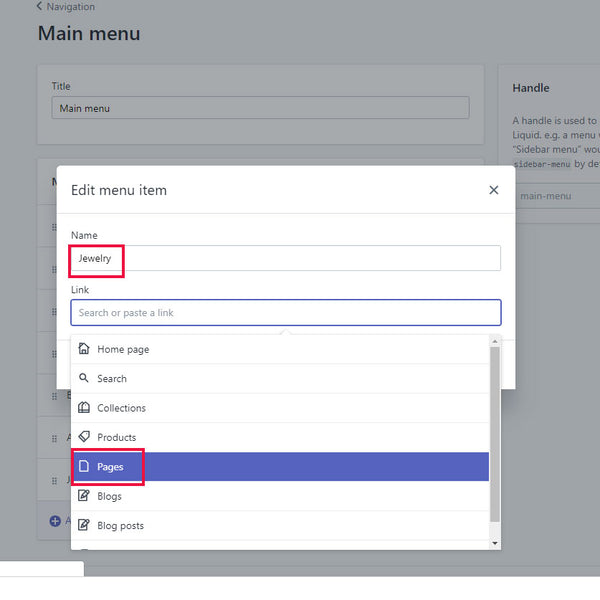
Now Select the page of collections where you wish to connect the menu and Apply the changes.
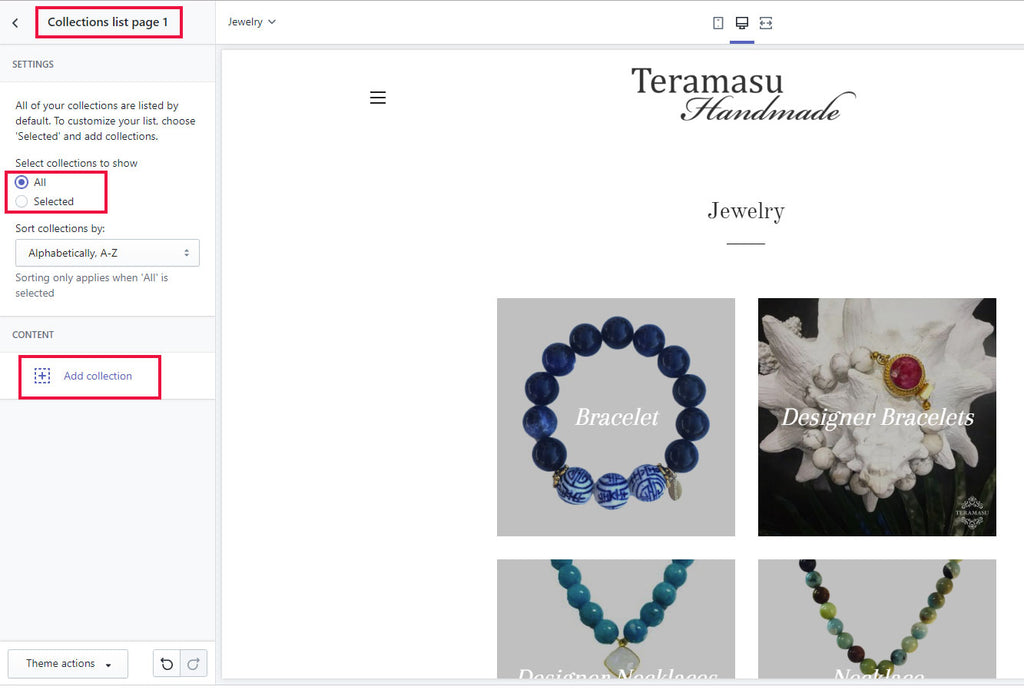
Finally, You can go to online store and choose Customize theme, navigate to your page and start customizing the collections that appear. Click on the Collection list page section.
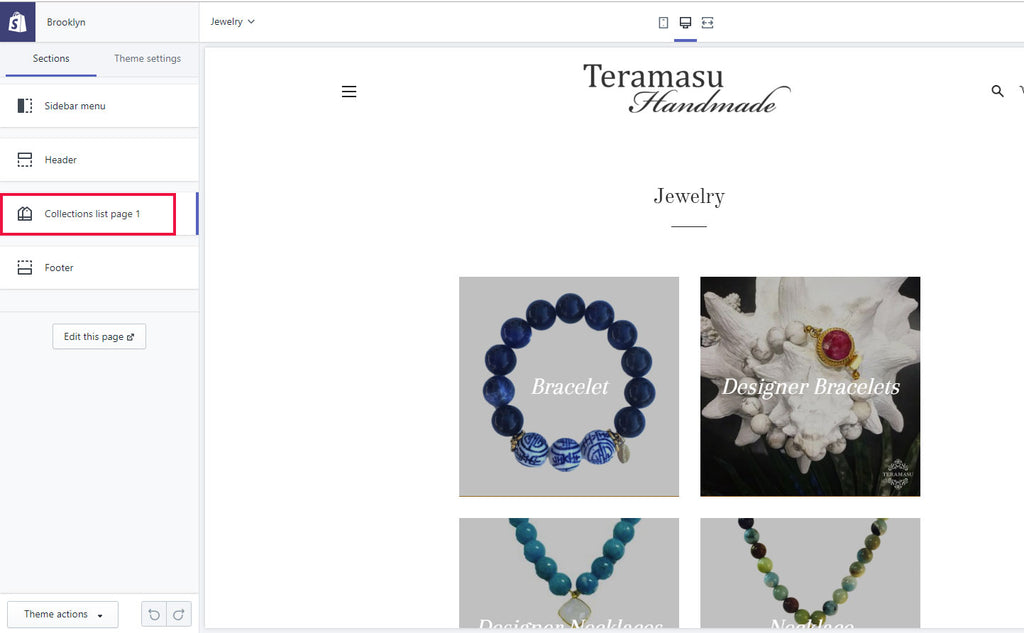
You will have the Choice to Show all or just selected collections. Choose selected and start customizing your page.
Let me know how it worked for you!
Want to learn the secrets of Sales Funnels?
I am a believer in sales funnels. As a disclaimer, I am an Affiliate and will receive a commission if you end up signing up for a paid subscription. If you want to learn about the sales process it is a good place to learn the correct way.

20 comments
I am trying to install this on my published Brooklyn theme and have come across the issue of having only:
page
page.contact
page.full-width
Any help would be much appreciated!
Thanks for the tutorial. Great stuff. Is this possible to do with another ‘collections’ page, instead of a ‘page’ page? That way I can show products AND the subcollections on the page, instead of just branching to subcollections…
Hello! I followed the tutorial and it worked fine! But the tile for the Collections are too large. Where can I make the font smaller? Thank you!
I followed the steps above, page creates etc, but I have selected only some of the collections present in the store, yet all of them are displayed on the page, regardless of the selection value of the radio button which says ‘all’ or ‘selected’ in the theme customisation. What am I missing?
Thank you very much for the great tutorial!
Just 2 questions:
1. How do I disabling the animation when hovering the collections (it’s nice, just not speaking the shop’s language so much)?
2. Where can I edit the overlay color and transparency?
Warm Regards and and thanks again and in advance!