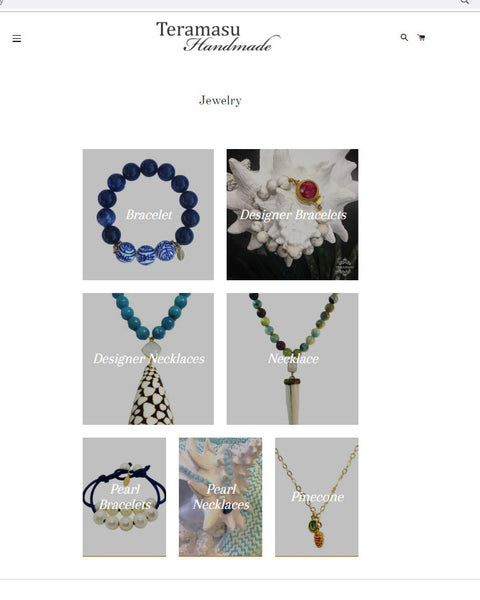
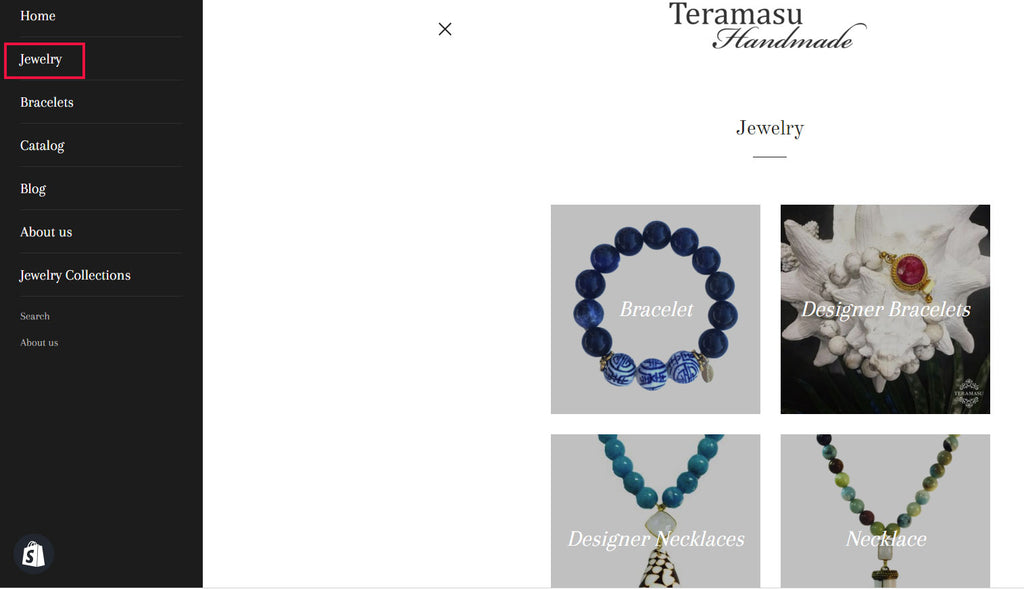
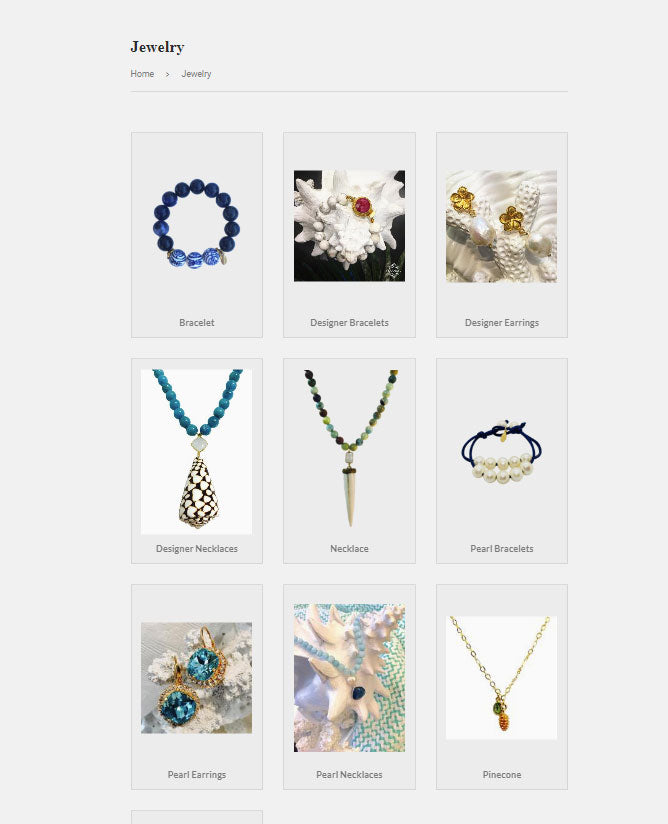
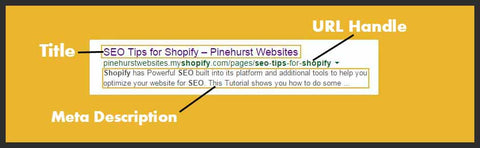
Adding a custom page template to your Shopify Simple theme will allow you to create a custom page with only collections you specify. For instance, you can make a page called Jewelry and have only the Bracelet Collection, Necklace Collection, and Earrings Collections, then you could create another page called Designer Jewelry and list only the Designer Bracelet Collection, Designer Necklace Collection, and Designer Earrings Collections.
]]>Adding a custom page template to your Shopify Simple theme will allow you to create a custom page with only collections you specify. For instance, you can make a page called Jewelry and have only the Bracelet Collection, Necklace Collection, and Earrings Collections, then you could create another page called Designer Jewelry and list only the Designer Bracelet Collection, Designer Necklace Collection, and Designer Earrings Collections.
Custom Page Template
You will Create a Custom Page template for each Custom Collections Page of Collections you need. For example: You could have a template for page.bracelet-collections.liquid and a template for page.jewelry-collections.liquid. You would then create a section for each changing the Schema name which is shown in green text within the code.
As always I recommend you make a backup of your Shopify Theme before beginning.
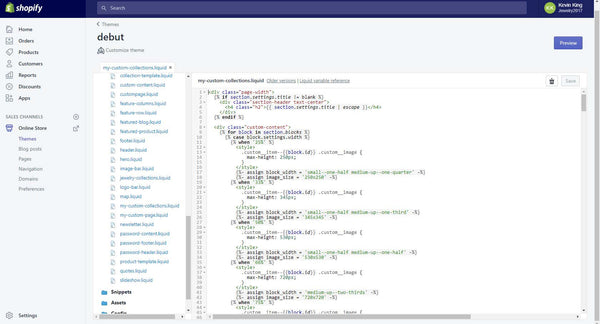
First You will Want to Create a New Page Template in Edit Code Area of Your Theme. Use the name shown in orange or create your own.
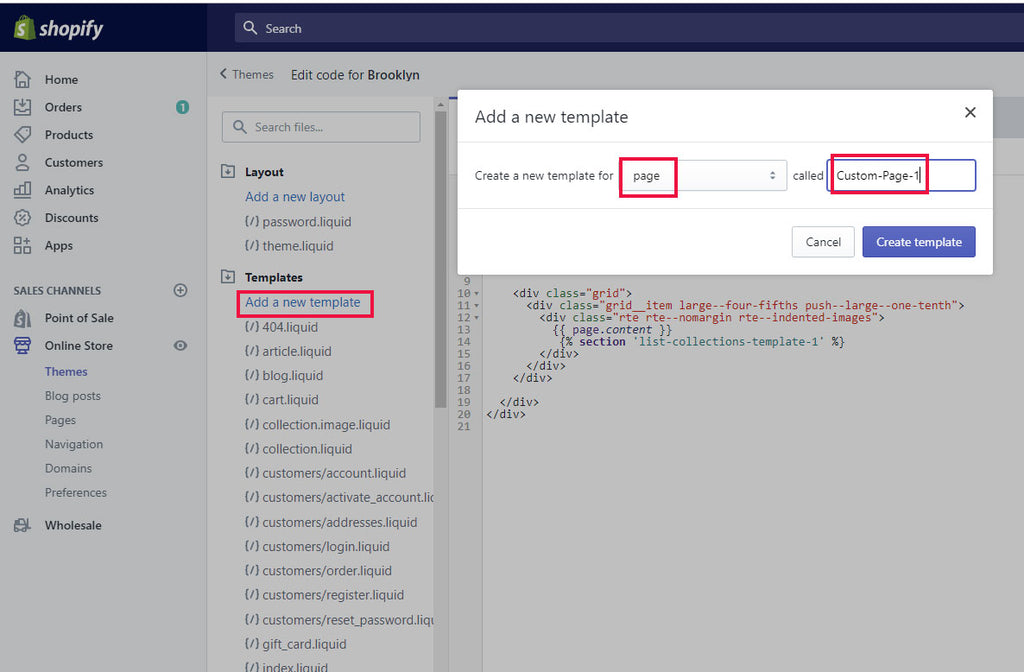
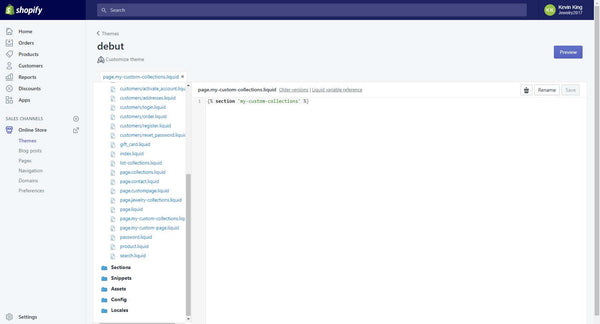
To create a template in theme code editor under Templates choose add a new template. Select page from the dropdown, then enter the name of your template. Copy just the portion in orange below for the name.
page.list-collection-1.liquid
Copy the 1 line of code in blue for page template.
{% section 'list-collections-1' %}
Find this code in the template: {{ page.content }} and place the cursor after the last bracket, then hit enter to create a new blank line below the code.
Paste the copied code in the line below the {{ page.content }}.
Copy code in blue from <!-- /templates/page.liquid --> to the last </div> below. Note the section name in Green. each new page template will need the new unique section name.
<!-- /templates/page.liquid -->
<h1 class="small--text-center">{{ page.title }}</h1>
<div class="rte">
{{ page.content }}
{% section 'list-collections-1' %}
</div>
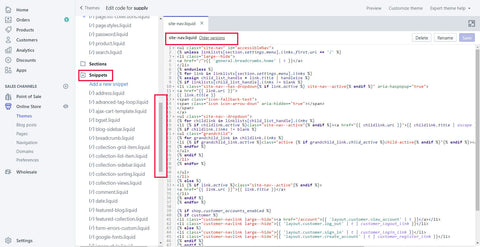
Custom Section
Note: You Need a unique Schema(see green text below) name for each Section you create. For example necklace-collections.liquid So you will need to create a new page and a new section for this custom collection and edit the new schema name in the new section.
Sample do not copy:
{% schema %}
{
"name": "necklace-collections",
"settings": [
{
To create a Section in theme code editor under Sections choose add a new Section. Select a name and save. Copy just the portion in orange below for the name and choose save.
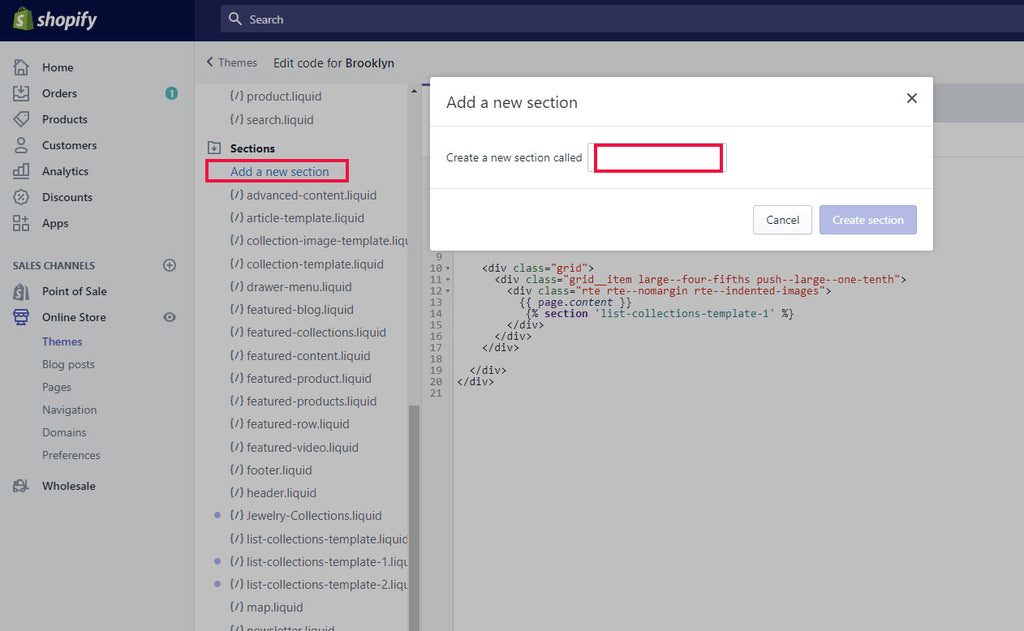
list-collections-template-1.liquid
Delete the prepopulated code and replace with the code below:
Copy code in blue from {% commment%} to {%endschema%} below. The Code in green containing schema name can be changed when adding new sections.
New Code
{{% comment %}
This page represents the /collections and /products pages.
{% endcomment %}
{% case section.settings.grid %}
{% when 2 %}
{%- assign grid_item_width = 'medium-up--one-half' -%}
{% when 3 %}
{%- assign grid_item_width = 'small--one-half medium-up--one-third' -%}
{% when 4 %}
{%- assign grid_item_width = 'small--one-half medium-up--one-quarter' -%}
{% when 5 %}
{%- assign grid_item_width = 'small--one-half medium-up--one-fifth' -%}
{% else %}
{%- assign grid_item_width = 'small--one-half medium-up--one-third' -%}
{% endcase %}
<h1>{{ page_title }}</h1>
<div class="grid grid--uniform">
{% if section.settings.display_type == 'all' %}
{% case section.settings.sort %}
{% when 'products_high' or 'products_low' %}
{%- assign collections = collections | sort: 'all_products_count' -%}
{% when 'date' or 'date_reversed' %}
{%- assign collections = collections | sort: 'published_at' -%}
{% endcase %}
{% if section.settings.sort == 'products_low' or section.settings.sort == 'date' or section.settings.sort == 'alphabetical' %}
{% for collection in collections %}
<div class="grid__item {{ grid_item_width }}">
{% include 'collection-grid-item' %}
</div>
{% endfor %}
{% else %}
{% for collection in collections reversed %}
<div class="grid__item {{ grid_item_width }}">
{% include 'collection-grid-item' %}
</div>
{% endfor %}
{% endif %}
{% else %}
{% for block in section.blocks %}
<div class="grid__item {{ grid_item_width }}">
{%- assign collection = collections[block.settings.collection] -%}
{% include 'collection-grid-item' %}
</div>
{% endfor %}
{% endif %}
</div>
{% schema %}
{
"name": {
"de": "Kategorien-Liste Seite",
"en": "Collections list page 1",
"es": "Lista de colecciones",
"fr": "Liste des collections",
"it": "Elenco collezioni",
"ja": "コレクションリストのページ",
"pt-BR": "Lista de coleções"
},
"settings": [
{
"type": "paragraph",
"content": {
"de": "Alle kategorien sind automatisch gelistet. Zum Ändern der Liste wählen Sie 'Ausgewählt' und fügen Sie Kategorien hinzu.",
"en": "All of your collections are listed by default. To customize your list, choose 'Selected' and add collections.",
"es": "Todas tus colecciones se muestran por defecto. Para personalizar tu lista, elige 'Seleccionadas' y agrega colecciones.",
"fr": "Toutes vos collections sont listées par défaut. Pour personnaliser votre liste, cliquez sur « Sélection » et ajoutez des collections.",
"it": "Tutte le collezioni vengono elencate per impostazione predefinita. Per personalizzare il tuo elenco, scegli \"Selezionato\" e aggiungi delle collezioni.",
"ja": "すべてのコレクションがデフォルトで一覧表示されます。一覧をカスタマイズするには、「選択済み」を選択してコレクションを追加します。",
"pt-BR": "Todas as suas coleções são listadas por padrão. Para personalizar sua lista, escolha \"Selecionado\" e adicione coleções."
}
},
{
"type": "radio",
"id": "display_type",
"label": {
"de": "Collections auswählen, die angezeigt werden sollen",
"en": "Select collections to show",
"es": "Selecciona colecciones para mostrar",
"fr": "Sélectionner les collections à afficher",
"it": "Seleziona le collezioni da mostrare",
"ja": "表示するコレクションを選択する",
"pt-BR": "Selecione coleções para exibir"
},
"default": "all",
"options": [
{
"value": "all",
"label": {
"de": "Alle",
"en": "All",
"es": "Todas",
"fr": "Toutes",
"it": "Tutti",
"ja": "すべて",
"pt-BR": "Todos"
}
},
{
"value": "selected",
"label": {
"de": "Ausgewählt",
"en": "Selected",
"es": "Seleccionadas",
"fr": "Sélection",
"it": "Selezionato",
"ja": "選択済み",
"pt-BR": "Selecionado"
}
}
]
},
{
"type": "select",
"id": "sort",
"label": {
"de": "Kategorien sortieren nach:",
"en": "Sort collections by:",
"es": "Ordenar colecciones por:",
"fr": "Trier les collections par :",
"it": "Ordina le collezioni per:",
"ja": "コレクションの並べ替え方法:",
"pt-BR": "Ordenar coleções por:"
},
"info": {
"de": "Sortieren funktioniert nur, wenn 'Alle' ausgewählt ist",
"en": "Sorting only applies when 'All' is selected",
"es": "La función ordenar solo se aplica cuando se selecciona \"Todas\"",
"fr": "Le tri ne s'applique que lorsque « Toutes » est sélectionné",
"it": "L'ordinamento viene applicato solo quanto è selezionato \"Tutto\"",
"ja": "「すべて」が選択されている場合にのみ並べ替えを適用する",
"pt-BR": "A classificação só se aplica quando \"Tudo\" está selecionado"
},
"default": "alphabetical",
"options": [
{
"value": "products_high",
"label": {
"de": "Produktanzahl, hoch zu niedrig",
"en": "Product count, high to low",
"es": "Recuento de productos, de mayor a menor",
"fr": "Nombre de produits, par ordre décroissant",
"it": "Conteggio decrescente prodotti",
"ja": "商品数の多い順",
"pt-BR": "Contagem de produtos, alta para baixa"
}
},
{
"value": "products_low",
"label": {
"de": "Produktanzahl, niedrig zu hoch",
"en": "Product count, low to high",
"es": "Recuento de productos, de menor a mayor",
"fr": "Nombre de produits, par ordre croissant",
"it": "Conteggio crescente prodotti",
"ja": "商品数の少ない順",
"pt-BR": "Contagem de produtos, baixa para alta"
}
},
{
"value": "alphabetical",
"label": {
"de": "Alphabetisch, A-Z",
"en": "Alphabetically, A-Z",
"es": "Alfabéticamente, A-Z",
"fr": "Alphabétique, de A à Z",
"it": "In ordine alfabetico, A - Z",
"ja": "アルファベット順, A-Z",
"pt-BR": "Ordem alfabética, A–Z"
}
},
{
"value": "alphabetical_reversed",
"label": {
"de": "Alphabetisch, Z-A",
"en": "Alphabetically, Z-A",
"es": "Alfabéticamente, Z-A",
"fr": "Alphabétique, de Z à A",
"it": "In ordine alfabetico, Z - A",
"ja": "アルファベット順, Z-A",
"pt-BR": "Ordem alfabética, Z–A"
}
},
{
"value": "date",
"label": {
"de": "Datum, alt zu neu",
"en": "Date, old to new",
"es": "Fecha: antiguo(a) a reciente",
"fr": "Date, de la plus ancienne à la plus récente",
"it": "Data, dal più vecchio al più recente",
"ja": "古い商品順",
"pt-BR": "Data, mais antiga primeiro"
}
},
{
"value": "date_reversed",
"label": {
"de": "Datum, neu zu alt",
"en": "Date, new to old",
"es": "Fecha: reciente a antiguo(a)",
"fr": "Date, de la plus récente à la plus ancienne",
"it": "Data, dal più recente al più vecchio",
"ja": "新着順",
"pt-BR": "Data, mais recente primeiro"
}
}
]
},
{
"type": "range",
"id": "grid",
"label": {
"de": "Kategorien per Reihe",
"en": "Collections per row",
"es": "Colecciones por fila",
"fr": "Collections par rangée",
"it": "Collezioni per riga",
"ja": "行あたりのコレクション数",
"pt-BR": "Coleções por linha"
},
"min": 2,
"max": 5,
"step": 1,
"default": 3
}
],
"blocks": [
{
"type": "collection",
"name": {
"de": "Kategorie",
"en": "Collection",
"es": "Colección",
"fr": "Collection",
"it": "Collezione",
"ja": "コレクション",
"pt-BR": "Coleção"
},
"settings": [
{
"label": {
"de": "Kategorie",
"en": "Collection",
"es": "Colección",
"fr": "Collection",
"it": "Collezione",
"ja": "コレクション",
"pt-BR": "Coleção"
},
"id": "collection",
"type": "collection"
}
]
}
]
}
{% endschema %}
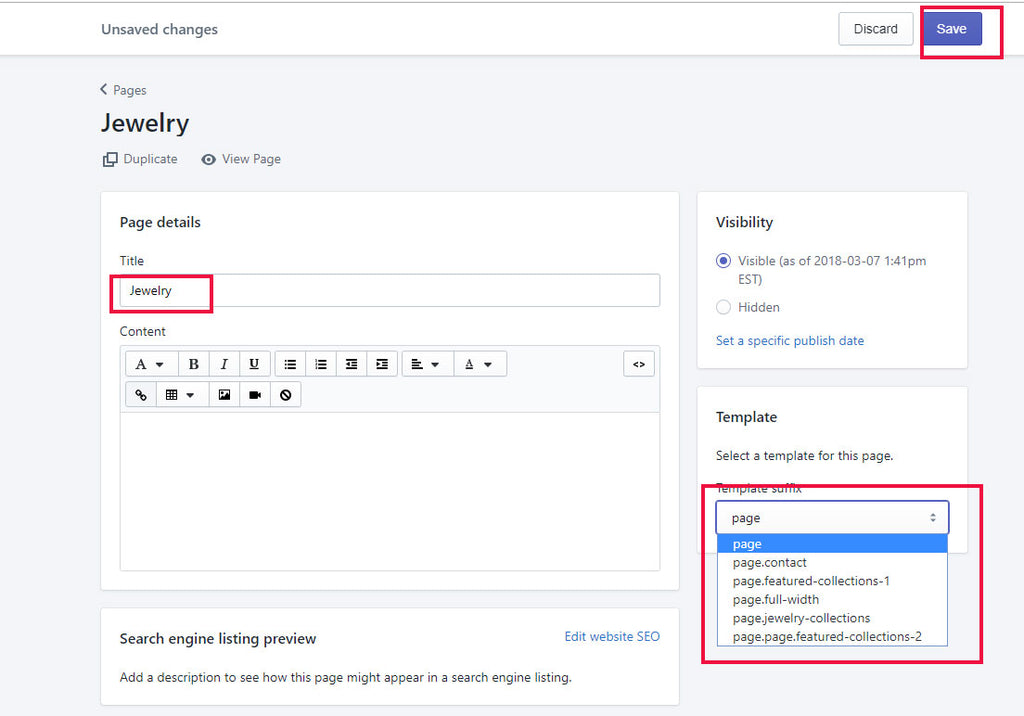
Now Create a Page and Use Your New Custom Collection Page Template
Go to pages in the Shopify Admin: Choose Add a Page. Name Your Page with a Title. For expample if your page is a page of Jewelry Collections, you could name your page "Jewelry". Once named, you can choose the template dropdown and choose the custom-collection-1 template.
Create Navigation Menu to Your Page of Collections
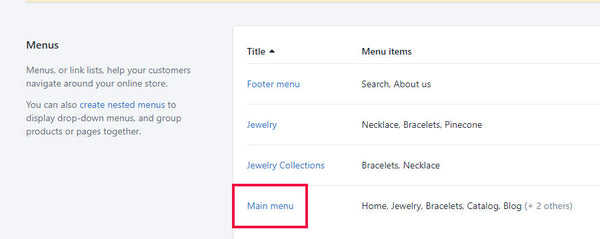
You will need a way to Navigate to your page of Collections in Shopify. Here are the steps to create navigation menus in Shopify.
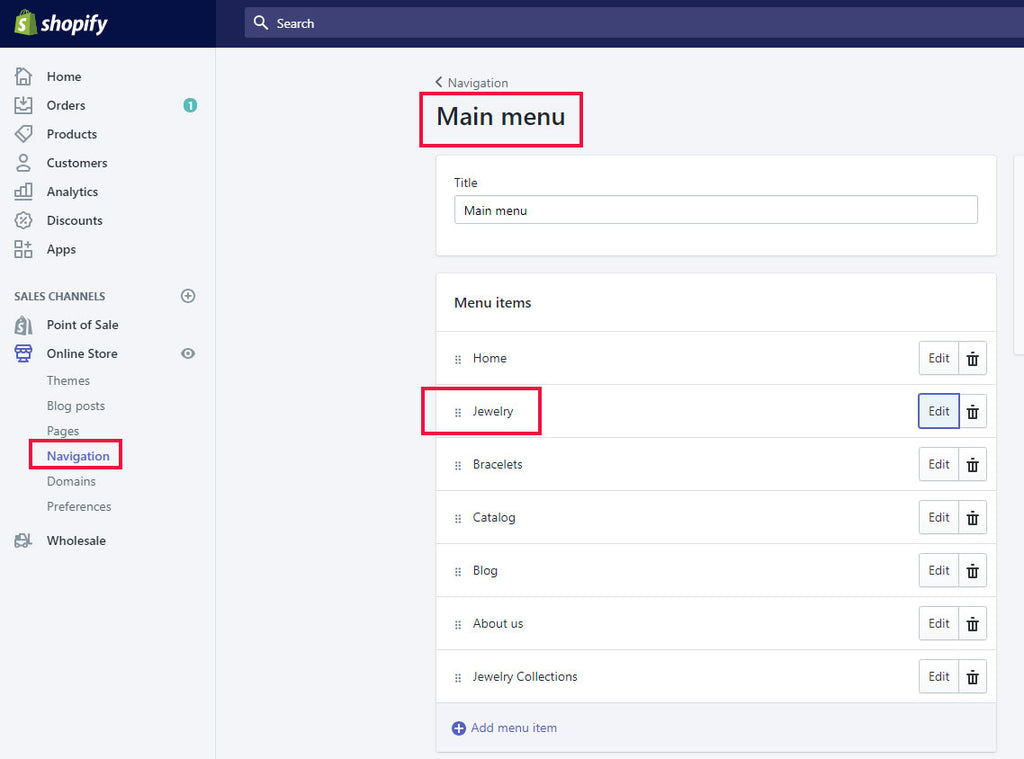
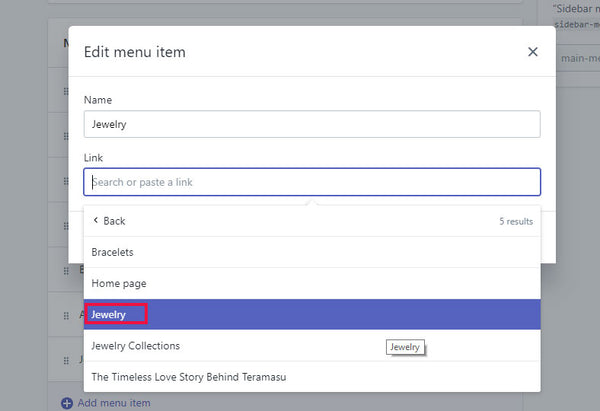
First Go to Navigation in the Admin and Click the Main Menu in Blue to expand the menu.
Click Add menu item if you do not already have a Menu where you want to connect the page.
Otherwise, Click edit on the menu you want to Connect. Add the Name and Select Page then Select the Pages.
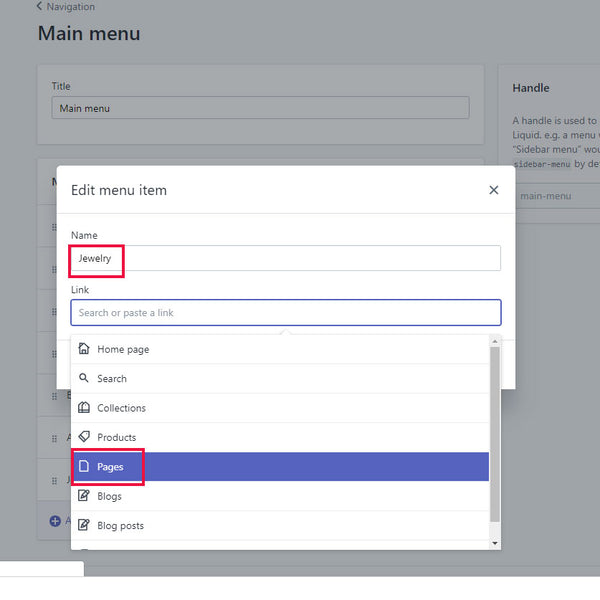
Now Select the page of collections where you wish to connect the menu and Apply the changes.
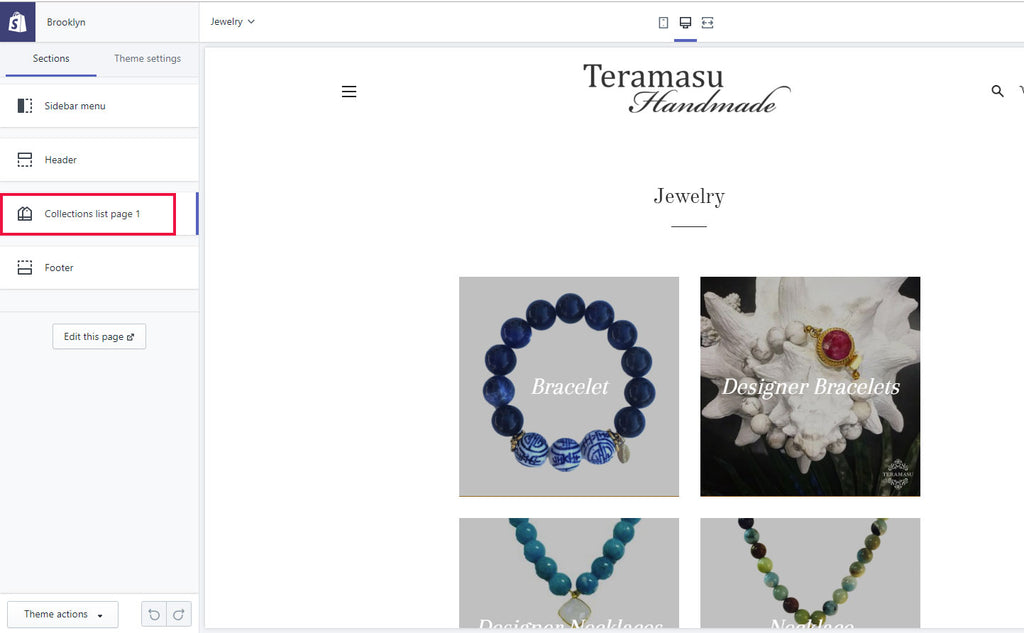
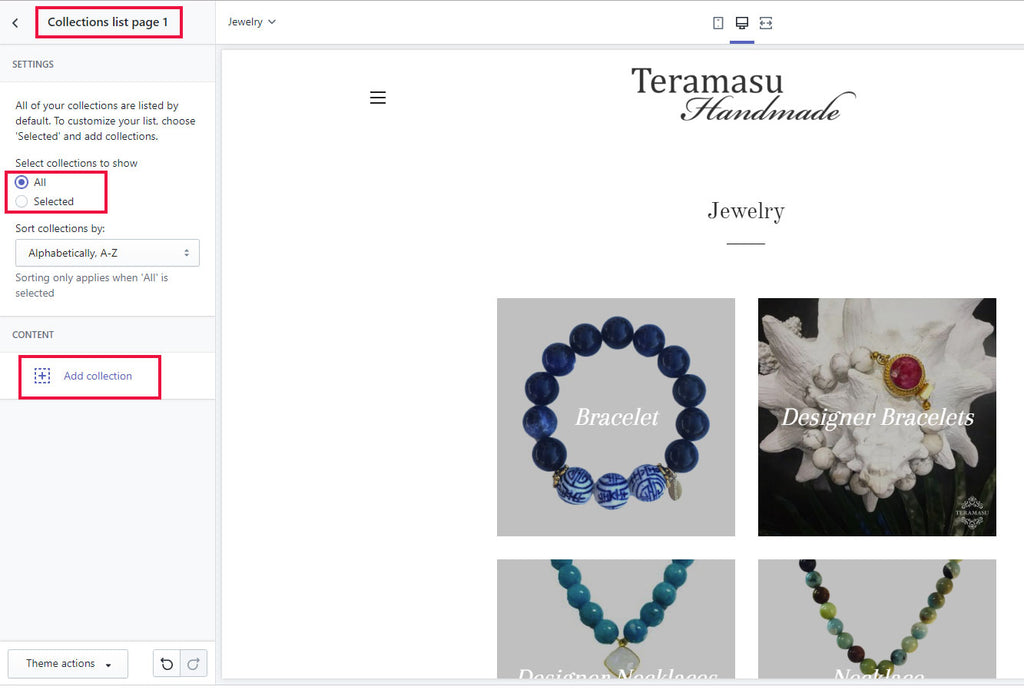
Finally, You can go to online store and choose Customize theme, navigate to your page and start customizing the collections that appear. Click on the Collection list page section.
You will have the Choice to Show all or just selected collections. Choose selected and start customizing your page.
Let me know how it worked for you!
]]>


 If you give lessons, sell subscription services or consumable products, or have service contracts, the time you spend charging cards every month can be spent selling, giving lessons, providing support, or expanding your business by using one of the recurring payment apps on your Shopify Website. You could be promoting your website to gain more subscribers!